Wednesday, November 2, 2011

Show 'N Tell-The Witch is in

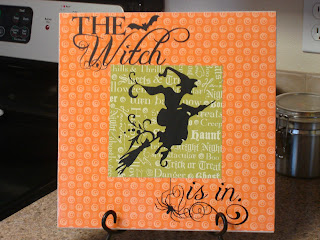
I just had to show off this beauty, my friend made with the Witch is in Vinyl
I love the addition of the inked edges.  If you missed the original post and want directions on how we did it, HERE it is.  She just inked her scrapbook 
paper before she modge podged it on!! I'll totally be doing that on my next one!!

I think it's so rustic, just had to share it with you!

12x12= $6.00 +$3.00 s&h or 
if you're in Idaho Falls, Idaho areas you can make arrangements to pick up your order.

Wednesday, October 5, 2011

Repost of the vinyl Calendar!

So I've had more and more emails asking me if these are still available.  So with the Super Saturday days coming up, I thought I better repost.  And if you have a big group doing these I can do a discount.  Just contact me!!


So my Sister-in-law (the awesome one behind the Creative Crate) had come up with a great frame remake.  Turning a frame into dry erase calendar.  She also decided that it would be a great Super Saturday project.  Don't you just love Super Saturdays...Right in time for Christmas gifts!!   And so inexpensive too.

Well when she did hers originally, she drew on the back of the glass with a permanent marker and then cut out vinyl with her Cricut.
Well when she approached me to do the vinyl, I had a little easier idea for the grid too.  And see what she did with it!!  I LoVe IT!!

Here's a few up close pictures for you.
Don't you love that beautiful paper she put on the back.  You could change it for all the season to match your decor!! Or if like the idea of it just being the wall behind it, it always looks good that way too.


This is what the vinyl looks like, but it comes mirror image from this cause it's applied to the back of the glass so when you use the dry erase marker on the front side, you can wipe it off and don't have to worry about the vinyl moving!


Vinyl sizes
8x10= $$9.00+$3.50 s+h
11x14=$9.00+$6 s+h
16x20=$17.00+$6 s+h
These sizes are based on the size of frame needed e.i the 8x10 vinyl will fit in a standard 8x10 frame on the glass.

I have black, choc. brown, brown, tan, cream, and white.  
If you'd like another color, I do have others, but these are the neutrals I have on hand.
Remember: Orders over $40.00 have free shipping. 


post signature

Tuesday, October 4, 2011

It's that time of season again and I thought that I'd share this one again, since it's fitting and versatile.  I will give the first 5 people to order it this year $10.00 off their order... even if you want me to resize the width to fit something specific for you.

So I love to celebrate Halloween!  And I always get a creative juices flowing around this time to spruce up the house with festive item for the next few months.

In my new house (which happens to be for sale now, Anyone Anyone...) I have a storm door that has a large glass window that was crying out to be decorated, so I created this to make it in season!! I placed it on the inside of my window to have more protection from the natural elements.
Just in case you can't see the top well in the above picture.

$35.00 - 20 x64 inch 


So this fits, my window of about 20 inches wide by 64 in length, but is totally versatile, because you can make the spider's spinner?(Is that what it's called) the length that you want.  The  spinner comes in 2 sections and you can always cut one or the other to make the length that you want.  It does require putting it up in pieces, which makes it easier to place, and also keeps the price down too.

If you have a different place you'd like to place it....I can resize and give you a quote before you order.  
Shipping is $5.00 since it'll need to come in a tube. But $5.00 for all shipping so order as much as you'd like.  

Email at   daisydotdecor@gmail.com   !

post signature

Wednesday, September 21, 2011

The Witch is in

So life has been extremely busy lately.  Not only did we add a (2nd) baby girl to our family a little less than 4 months ago, but we're trying to sell our house and move a little bit north closer to my full-time job that I started a few weeks ago.
Crazy crazy decision going around our place.  But I did have a friend that is in charge of a Super Saturday for her ward and I've been able to play around with some more vinyl projects. And since I can get a little stressed out my husband probably thinks this saying is appropriate.
I wanted to start with this one since we're coming upon Halloween in no time flat.  And Halloween is one of my very favorite holidays.  So she found a cute witch silhouette that she loved and I recreated it with a few additions.
I also needed a gift for BUNCO night with the girls.  And so this is what I used "the witch is in" vinyl.

Really simple to do.  I had extra ceramic tiles at home.  So I chose to use one of those, and they are cheap when on sale.  I just Mod Podged the first 12x12 (cut to fit perfectly) down and let dry.  Then I centered the green 6x6 in scrap in the center and just covered it in Mod Podge and let dry.  And I just topped it off with the vinyl and smoothed.  Probably the fastest project I've done for a while

These two were completed by Lacey for her Super Saturday examples.  These are boards painted, let dry, and then apply the vinyl.  That witch silhouette is just itching for a glass cookie jar to hold all that trick-or-treating candy. 

Here are some prices for you
The Witch is In
      12x12= $6.00+$3.00 S+H
Witch silhouette
       8x8=$5.00+$2.50 S+H
You only have to pay shipping and handling once per order.  I can re-size and give you a quote and if you have a Super Saturday coming up I can cut you a deal for large orders.
This almost makes the cooler weather that's coming seem okay!!
post signature

Monday, June 27, 2011

Girls camp theme- Live Like You Believe


So I had a neighbor contact me about doing a little gift for her Young Woman at Girls camp this year.  She had found a logo similar to this that she liked so I got going made one similar that I could resize.

Put these on galvanized sheet metal and then place in a 2x4 with a routered groove for a base and you've got a cute little gift that packs flat.  Ideal for bringing home.

These are both originally 6x10.25 inches, but can be resized to fit whatever size of metal pieces you can find.
This size cost $4.00 + s&h
12x12 cost $5.00 + s&h

Email me at daisydotdecor@gmail.com if you want to order..Let me know if you want the straight or curved frame, color, and size you would like, and I'll send you a paypal invoice.


post signature

Friday, June 17, 2011

Tributes to Dad

So it's been a long time since I've posted and I should've had these up way before now.  Fathers have been on my mind a lot these last 2 weeks since my husband became a father for the second time to another cute little girl!!
It's been so fun to watch him keep our older girl, Kherrington, occupied and feeling loved and then to see him steal, Tynlie (Tin-lee), in the evenings and give her some squeezes!!  What a great man I married and an awesome Dad.

So in honor of Father's day here are some cheap ways to show our appreciation to our Dads and Fathers in our lives.
These 3 designs are sized to fit perfectly on a 12x12 tile.


These are $7.00 a piece plus $5.00 s&h
Any order over $40.00 have free shipping.
To place an order email me at daisydotdecor@gmail.com
post signature

Friday, May 27, 2011

Toddler chairs: before and afters


So I totally teased you all with a picture of the chairs in my children's table makeover found HERE
And here is the end result, but for some reason I don't have a picture with both chairs, even thought they are exactly the same.  I just love that lacquered finish on the black.  Something we decided to do on the table legs and the chairs so they could with stand a little more beating that I'm sure is to come with more kids and playing.
Again my husband sanded the wood legs down and stained away.  We used an Ace Hardware brand stain in Walnut.  It's one I had on hand for lots of my other crafts.  Really walnut is my favorite shade of stain.  And when we lived in Pullman, WA, there really wasn't many other option besides our local ACE to buy things like that.
  We were a little worried about the white almost laminate covered seat and back, but with a light sanding and some black gloss paint (which we inherited from my mom again, since they were done with it and we had just about 5 more projects to paint black) took just fine.  It was then finished off with a few coats of that beautiful high gloss lacquer.  Thanks again Hubby for all the hard work.  Kherrington loves having chairs that she can get off and on all by herself and not tipping over while she's sitting at the table!!
post signature

Saturday, May 21, 2011

Scalloped Circle and Initials!!


So I'm so excited to show you all this new addition to my vinyl collection.  This idea I got through my crafty sister-in-law at the Creative Crate, I know she saw this idea somewhere on the Internet..but I sure don't remember where.  Where Stacie was/is going to put hers is way cute because she has painted stripes on the wall.  But she hasn't put it up yet, cause they might be building soon and doesn't want to waste it.
But I knew that I'd end up putting it in my little girls room too when I saw it.  
So I'm sort of spoiling my future reveal of everything that we've done in this room by showing these pictures but I just couldn't resist!!


So it's a big circle, that is a toddler sized bed though.

Original scalloped circle #1

So I totally remade another scalloped circle to have less scallops cause I thought I'd like it bettter.
and I do!!  One of these days I'll have to cut Kherrington a new one


14 point scalloped circle #2

So these measure about 35.5 inches on the outside of the scallops and comes in 3 pieces. Two pieces for the scalloped circle to make it easier to apply and also one more piece for the initial

This is the font that I like most with it for the initials, but if you have a different font you'd like to see in an example I can send you a PDF via email.

At that size the 3 pieces are a total of $55 and since we're over $40 the shipping is free.  Let me know if you would like a smaller one and I can get you a quote!!


I know you're dying to put it somewhere...Where's it going to be.
Shoot me an email at daisydotdecor@gmail.com and I'll need what colors you'd like the circle, the initial, and which initial you would like.
Here's a link to the colors I have on hand, but I'm willing to order others!!
post signature

Friday, May 20, 2011

Children's table and chairs:Before and after

So here is a snap shot of our cute crazy haired child modernized farmhouse table from Shopko that I had such an interesting time getting home the first time.  You can read about that all HERE at my personal blog.  What a fiasco, but we've totally loved it.  Even though it fit with our dark stained cherry cabinets a little bit better than the knotty alder cabinets that we have in our current house we moved into about a year ago!!  Crazy how time flies.  


So you see that beautiful little table that K is sitting at.  It wasn't always that cute....I wish that I had a before picture, but my hubby is such a doer that I didn't get one.  You'll soon see that as a trend as I start posting all those before and afters that we've been up to lately.  I should train him to at least tell me before he starts the project!!  I can't complain though cause he's been a painting fiend lately, since I'm totally ready to pop about any day now and have another little girl join our family I haven't really got in on any of the painting.  So I really am just glad to have the hard work finished.  Thanks Hubby!!

Well that table came from a DI, that my awesome thrifty mother frequents at least once a week!! And man have we benefited from her finds... You'll see in the next few weeks of posts.

So where you see black legs...was once a bright cherry red color.  And that nice cherry topped table that matches our own dining room table was an oak color like the legs of the chair below.  This is the one toy piece that I've let stay in our great room.  That and the box that is on top of it in the the above picture that has her kitchen necessities and food set in them.  They are usually stored under the table.
She sits at this table so many times a day for coloring or playing.  It's been nice for her to have her own space.
One of these days when we finish the basement I'm sure they will live downstairs.  Oh that thought is lovely!!

But the only chair we had to go with it was one that my husband had growing up that had long legs.  So then enters in 2 chairs like the one above.  Another DI find from my Mom.  I'll show you that transformation in another post hopefully soon!!!

post signature

Monday, April 4, 2011

Monday Menu

So I thought maybe I'd get on the ball a little better and share my menu plan for this week.  Which means one of two things.....You get the plans, but no step by step instructions until after the fact.  I'll try to get some recipes up!!!
***WARNING:  It's a Our Best Bites week!!

Monday-  I'm trying this recipe.  I think it looks so yummy and I have to drive to IF tonight to prepare for work tomorrow morning.  So I needed something simple.  I'll have to let you know how simple they really are..
Tuesday- I'm working a 12 so Hubby gets to fend for himself!!
Wednesday-Stuffed Shells, from the Ronzoni box, with fancy french bread.  I'll get a tutorial for these.  Super easy main coarse and yummy idea you can do with french bread bought at the store although I'll be baking my own.
Thursday- Just trying to mix it up a little and hoping Spring is going to show up!!
So I'm trying a hamburger variation "Samburgers" from Best Bites again.
Friday-It's date night!!  We get to celebrate by going to Rodeo here in town, which just happens to be what we did on our first "blind" date over 5 years ago!!! Can you tell I'm WAY excited
Saturday- Best Bites it is again. Potstickers. or Asian wraps. or Leftovers.  We'll see how the prego lady is feeling by this point.  8 more weeks to go!

Crazy 3 new recipe trials this week, hope I can get you guys some good tips too!!
post signature

Tuesday, March 22, 2011

Strawberry Spinach salad-Simple!!

So this a a quick throw together thing that I love.  Hope you enjoy it as much as I do.  I know my husband gets sick of this cause I want to eat it all the time.  What can you expect...I'm pregnant and have to feed those cravings.  If he doesn't want his...I eat it too!!
This is one of the reasons I almost always have strawberries on hand.  Even in the winter  splurge and buy them.  Or I get them in my bountiful basket and then I don't feel guilty at all.  

So strawberries cut into bite sized pieces

I love baby spinach, but if the bunches of regular spinach are only $0.78 I can't really justify in buying the bags of baby spinach.  So I just cut off the stems and tear it up.  Then add the cut strawberries and top with this awesome poppyseed dressing(below).  I buy mine at the local Winco.  Love this salad, it's almost like a dessert to me. 
The oval sticker above says it's good on fresh peaches.....MMMM I tried it and totally prefer it with the strawberries!!

Is this one more readable?  

Enjoy this simple salad!

Monday, March 21, 2011

Faith is the Power....

So I've been meaning to get this posted forever.  I made this window well over a year ago, along with several others to sell at the craft fair that I did. I only had one left over.  Man they sold like hot cakes!  But I didn't have a good picture of a finished product so I have been holding off posting them here.  SO you can see I still need a good picture of a finished product, cause the walls in the house we bought are almost the same exact color as some of my vinyl, (cream/light tan).  
I was just getting too anxious to get these posted, that I didn't wait until we'd painted a room a different color.  
I swear it's not going to be long and we'll my hubby will have 2 rooms painted.  I hate being pregnant and not being able to help with the painting. HEHE.  Okay I really do feel bad, but he's an awesome painter so shouldn't I leave it to him anyway?!


#1                                         #2


 You can see how striking this can be behind a colored background/wall!! That is if I didn't have the window reflecting on my glass.  *sigh*

If you're local to the SE Idaho area, I would sell this one for $75.00, but if you want to find your own old window or just put it on your wall the prices follow.

18in wide x23in. ht = $40+$5 s&h
*Note any orders over $40 get free shipping and handling
It comes in 2 parts/ and I need the 2 colors you'd like.  Find my current color selection here.
And which fonts do you like #1 or #2.

I can do custom sizes and they don't cost extra, if you have a space in mind that needs filling, shoot me an email and I'll get you a quote.


post signature

Friday, March 18, 2011

7-Up Chicken-Dutchoven turned oven recipe.

Got this awesome recipe from my Aunt Verla years ago and my Mom figured out how to do it in the oven.  Easily a family favorite, Home style meal.
Makes a lot, so you may want to half it.  Serves 8-10 depending on how much chicken you want.
Basic ingredients: 
1/2-1 pound bacon
little flour
8 chicken breast or 12 thighs
Lawry's seasoning salt
Garlic powder
pepper
Carrots 
potatoes
onions
1 can of 7-UP
Butter/margarine

Fry up bacon.  I cut mine before with my chicken shears to make it easier. 
Then  place your bacon in the roasting pan.  Save the bacon grease to brown your chicken.

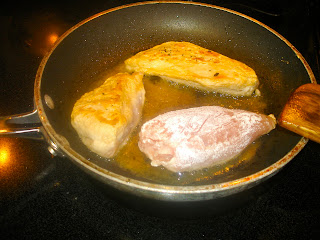
Flour your chicken breast and then pan fry them in the bacon grease.  Add more oil if needed.


Then placed browned chicken breasts  in roasting pan.  Season LIBERALLY with Lawry's seasoning salt, garlic powder, and pepper.  This is where it gets most of the flavor.  I do it over board and then do some more.  You can always add it later in your cooking if it isn't flavorful enough for you.


I just use baby carrots so I don't have to cut them.  (I go for easy) And then I quarter a large onion when I'm making a half batch, but quantities all depend on your own preference of vegetables.

Then I peel the potatoes and throw them through my Bosch food processor french fry cutter (Love my Bosch)  A whole post in itself I'm telling you!!

Add 1 cube of butter/margarine, 1 cup of water, a can of 7-up and into the oven at 350 degrees.  Now depending on the size of your potatoes it can take between almost 1.5-2.5 hours .  With my potatoes cut like this 1.5 hours is usually sufficient.  If you are still in a dutch oven, it cooks over hot coals for about 45 minutes -1 hour. 

NOTE: this is not a meal that freezes well for later,unless you removed some for freezing before all the vegetables are done.  Otherwise you loose all the texture once you freeze it.  I suggest just halving and eating leftovers for a small family.